Modification notes for:
Heath-Zenith SL-5408:
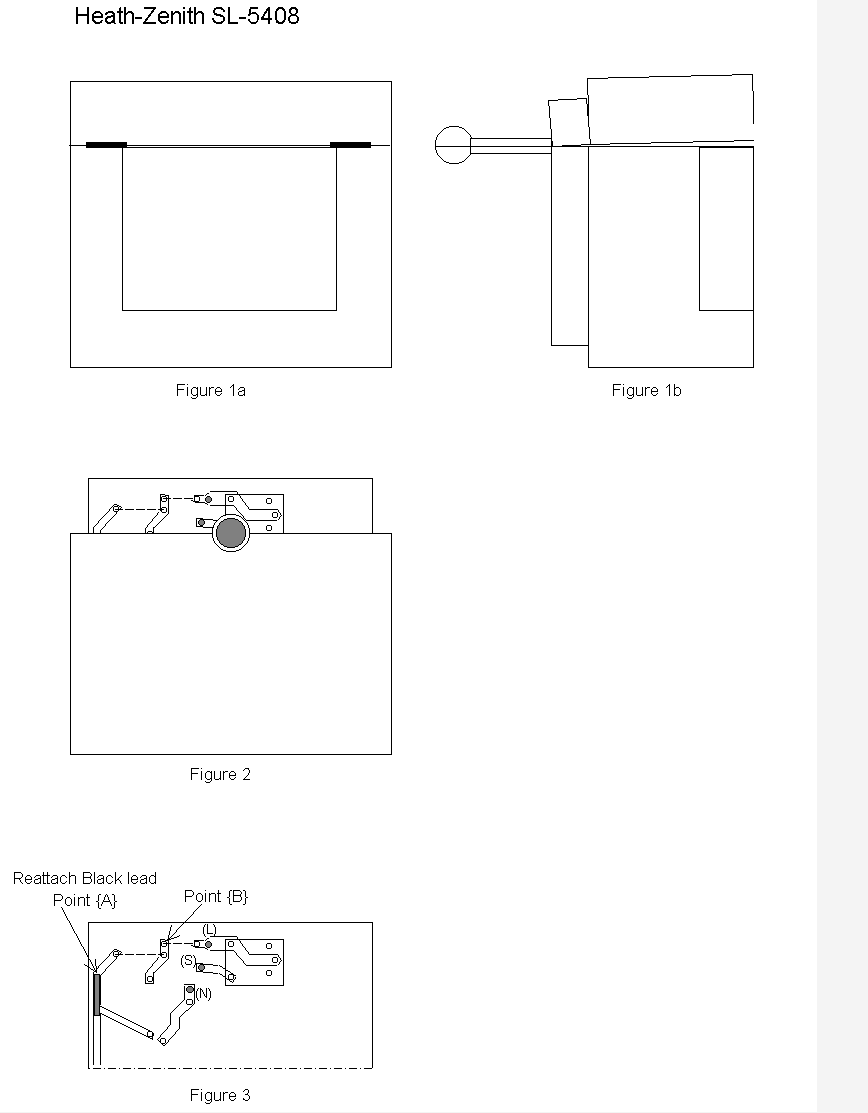
(See front view, Figure 1a, side view, Figure 1b)
Note positions of controls, for reassembly.
Insert a small bladed screwdriver under the cutouts above the lens,
and pry the top cover up, breaking the glue joints. The cover will
separate along both sides, and in a semicircle above the wiring post.
(See rear view, Figure 2)
Enough of the printed circuit board should be exposed to complete the
modifications. It can be pulled up slightly if necessary.
Loosen the screw clamping the outer, threaded portion of the wiring
"knuckle", and rotate it up past the normal limit of motion, to
pop the outer part off the post attached to the sensor head.
Grip the black rubber seal with needle nose pliers, and slide it an
inch or two along the wires. This will facilitate adding the extra
wire needed later.
(See PCB drawing, Figure 3)
1) Remove two components indicated by dashed lines, R2, R1.
2) Remove Black wire from terminal 'L', and reattach at {A}.
3) Add a new Red wire at terminal 'L', where Black lead used to be.
Thread new wire out through wiring post and rubber seal. Slide the
seal back down and push into place in the wiring post.
4) Reassemble:
Slide PCB fully into housing, ensuring it slips between card guides.
Snap knob back in place, if removed.
Replace cover, ensuring correct alignment of the white plastic lens,
the clear inner plastic support and the sensor chip on the PCB.
Pop the wiring knuckle back together, and slightly tighten the
clamp screw.
Check that unit is working, before re-glueing cover!
Connections:
Red / Red - Isolated output contacts:
240 VAC / 10 Amp
120 VAC / 10 Amp
24 VAC / 5 Amp
Black - Power return.
White - Power high.
This model will not work on DC (battery) power, without more extensive
modifications to the power supply circuit. I haven't tried it with
low voltage AC yet, but would recommend about an 18 V transformer.
If a higher voltage transformer is used (say a 24 V sprinkler
transformer), make the following change:
Attach the Black power lead at {B}, instead of {A}. Install a new
resistor in place of R2. The new resistor should be 1/2 Watt, and
it's value should be 70 Ohms times (Transformer voltage - 18). For
a 24 V transformer, that's 420 Ohms. The nearest 5% or 10% value
would work fine.